Palo Alto GlobalProtect Authentication Sequences And Authentication Bypass Cookies

While working on GlobalProtect on one of my Palo Alto firewalls, I ran into a strange behavior, and I don’t see any documentation about it on the internet, so I figured I should write something about it here.

At my company, we are starting to deploy GlobalProtect for remote-access user VPN, and on the firewalls at a couple of locations, we were authenticating users with locally-created user accounts on the firewalls. This of course is a bad idea and is completely non-scalable. At the same time, though, we are starting to deploy a new corporate Active Directory, and we already have all our users in Office 365, so I started working on VPN authentication using AD and Azure MFA. This was a whole other challenge. Suffice it to say, I settled on using Microsoft NPS as a RADIUS server, and using the NPS Extension for Azure MFA to trigger an MFA prompt. This works pretty well, a RADIUS request hits NPS, which authenticates against local AD first. If the authentication succeeds, it sends a request up to Azure AD, matching the UPN of the local AD user with Azure AD, and triggering a MFA request using whatever MFA method the user has set as default in O365. This even works for SMS codes or phone calls.

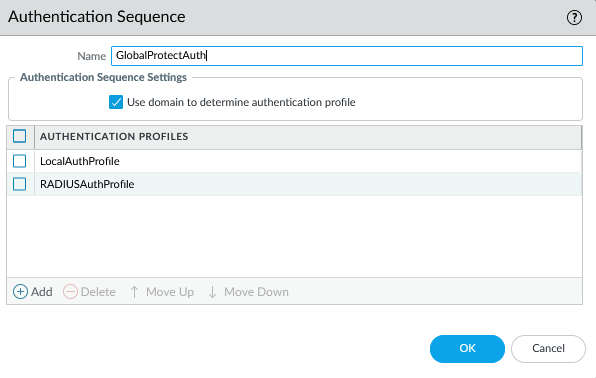
So I had a workable RADIUS authentication method that provided MFA using Azure MFA. I still needed to support the local authentication method as well in GlobalProtect though. I created an Authentication Sequence for it, using the local auth profile first, then the RADIUS auth profile second, and I assigned this authentication sequence on the GP Portal and Gateway. And here is where the weirdness started.

When a user with a local account would connect, it would work normally. They’d enter their username and password, and within a couple seconds they’d be connected. However when a user would log in with a RADIUS username and password, they’d get an Azure MFA prompt like normal, then the login process would sit there for about 90 seconds, then eventually it would prompt them to log in again. They’d enter their username and password again, they’d get another MFA prompt, and finally they’d be connected to the VPN. This was clearly not a satisfactory experience, so I started trying to figure out why.

If you’re familiar with configuring GlobalProtect, you know that there are two separate components to it, the Portal and the Gateway. The Portal is the initial point of contact, where a user authenticates. The Portal then tells the client what Gateway to connect to (or offers multiple choices). The client then connects to a Gateway and this is what the client actually builds a VPN connection to. In many cases the Portal and Gateway exist on the same firewall device, but they don’t necessarily have to. The key to this annoying multiple-authentication behavior is that the client has to authenticate to both the Portal AND the Gateway independently. To reduce the annoyance of having to authenticate twice, both the Portal and the Gateway have the ability to generate and/or accept an Authentication Bypass Cookie. This is a cookie that the client receives that can be used in lieu of an actual authentication challenge. Generally you configure the Portal to generate a cookie, and the Gateway to accept it. Then when the client authenticates successfully to the Portal, it gives the cookie to the Gateway and is allowed to connect, rather than having to authenticate again.

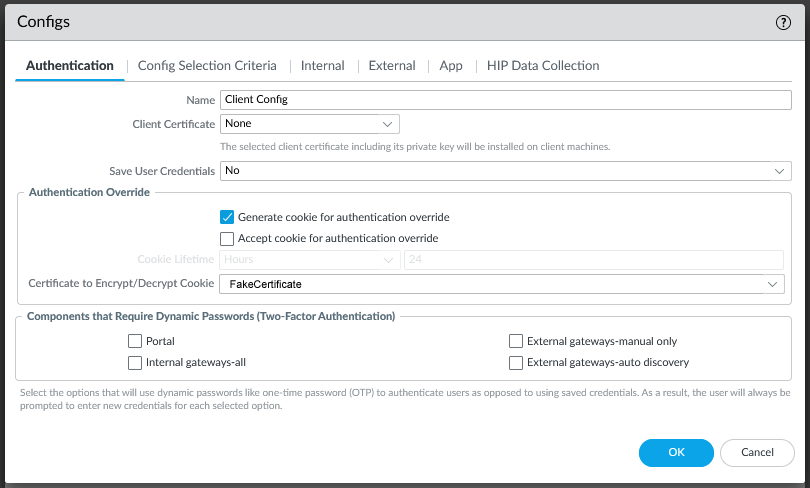
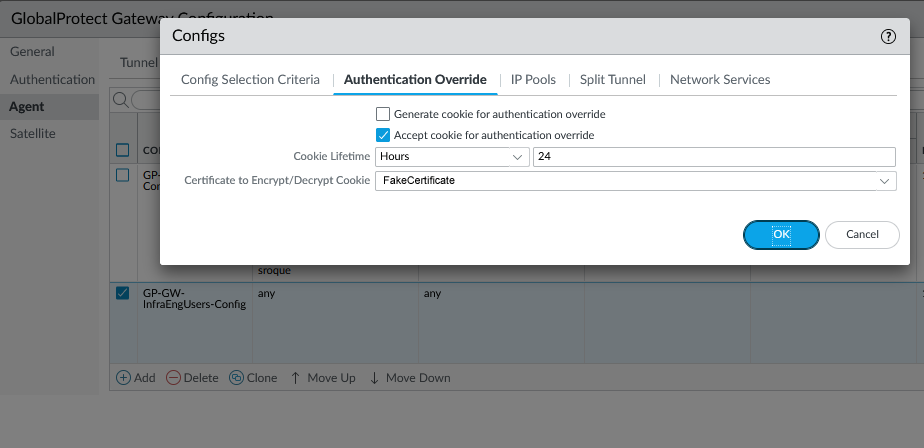
This is how my firewall was configured, but for some reason it was not working. The user would authenticate to the Portal, but then they’d have to wait for 90 seconds, then they’d be prompted to authenticate to the Gateway. For some reason, the authentication bypass cookie wasn’t being accepted by the Gateway.

I fought with this issue for a while, and eventually opened a support case with Palo Alto. This was an extremely unsatisfying experience, that eventually ended with the support person telling me that the cookie doesn’t actually pass through the username and password, and the behavior I was experiencing was just how it works.

This was, of course, absolute nonsense.

After a lot more parsing of mp-log authd.log, I finally got a complete picture of what was happening. The issue was that I was using an authentication sequence for the Gateway, with a local auth profile first in the sequence. When the authentication passed on the Portal, it moved on to the Gateway. The Gateway saw that there were multiple authentication profiles that the auth could match, so it ignored the cookie and attempted to authenticate against the profiles in turn. The local auth profile returned a reject immediately, so it moved on to the RADIUS auth profile. This all happened very quickly after the initial RADIUS auth succeeded, so NPS treated the second authentication as just a retransmit of the initial request and ignored it. The firewall didn’t know this though, so it waited for the RADIUS timeout set in the RADIUS authentication profile. This value was set for a long time, 90 seconds, to give users enough time to deal with the MFA prompt from Azure. So the user would just sit there waiting for RADIUS to time out, then eventually when it did, they got prompted to authenticate again. They’d put in their username and password again, respond to the MFA challenge, and would finally be logged in to VPN.

The solution to this issue ended up being really simple. The authentication only actually needs to happen on the Portal, and all the Gateway should need to do is to decrypt the authentication bypass cookie. So there is no reason why the Gateway needed the full authentication sequence. I changed the authentication method to just the local authentication profile, and suddenly my problems went away. A user would authenticate to the Portal, would receive a cookie, and would be passed through the Gateway.

Thanks for nothing, Palo Alto support.

Currently drinking: Sam Adams Octoberfest

Leave a Comment

Filed under IT

ESXi Local Storage Preparation for VSAN

I recently set up a new vSphere lab cluster with the goal of trying out VSAN. My existing lab had been using an old Equallogic SAN for shared storage, and frankly I was pretty tired of the noise. My first plan was to move over to Nutanix Community Edition, so I bought some SSDs for the cache tier on my three hosts, and set up Nutanix. That turned out to be a complete dumpster fire. I really wanted Nutanix CE to be good, I’m a fan of their commercial platform as a host for VMware, and really hoped that they could pull off the hypervisor as well.

Nope. The reason why not is a subject for a separate rant.

Anyway, the other thing I wanted to try was VMware VSAN, and since I already know that vSphere is a great hypervisor platform, I was much more comfortable with this. Setup was an absolute breeze. Once I had vCenter up and running with all my hosts connected, configuring VSAN was a piece of cake. Well, mostly, anyway. I had previously set up Nutanix CE on these drives, and since they already had partitions allocated, the VSAN disk import process didn’t see any of my disks. The solution was to delete the partitions on each of the disks from an SSH session to the host.

To see the partitions, you can simply do
ls /dev/disks/
which should show you something like this:
ls /dev/disks

Notice that there’s an entry there called mpx.vmhba32:C0:T0:L0, and then there’s 6 more after with a :1, :5, etc after it? The entry without the :# at the end is the parent disk, all the others are partitions on the disk, and the number after the colon is the partition number. You can see more details about the partitions by doing
fdisk -l
which will display all the partitions on all the disks on the system. You can display just the disk you are interested in by doing
fdisk -l /dev/disks/mpx.vmhba32:C0:T0:L0
which displays just the partitions for that one disk.
fdisk -l /dev/disks/mpx.vmhba32:C0:T0:L0
Incidentally, the tool fdisk is deprecated, the replacement for this is
partedUtil getptbl /dev/disks/mpx.vmhba32:C0:T0:L0
but I find the output of fdisk -l to be much more readable. Anyway…

How can you tell what these devices are anyway? Try
esxcli storage core device list
which outputs a ton of information about all of the storage devices attached to the host. The relevent snip here is
esxcli storage core device list
You can see from this that this device has the display name “Local USB Direct-Access”, this is the USB flash drive that has ESXi installed on it.

To delete a partition that you don’t want, like a left-over Nutanix CE partition, use
partedUtil delete /dev/disks/DeviceName PartitionNumber
So if I wanted to delete partition 9 on my USB stick (a really bad idea) I’d use the command
partedUtil delete /dev/disks/mpx.vmhba32:C0:T0:L0 9

To allow the VSAN disk import process to detect the disks, go through and delete all the partitions on all the disks you want to use as part of your VSAN volume.

One other problem I ran into was that I set up a VSAN on all my disks, then had to blow away my entire vSphere environment and start from scratch again, reloading the hosts with ESXi and setting up a new vCenter. After this, I tried to set up VSAN and again the disks were not found. I attempted to delete all the partitions on the disks, but it wouldn’t let me do it. Turns out that vCenter saw that those disks had been part of a VSAN disk group before, and so it treated the disks as in-use. The solution was to run the command
esxcli vsan storage list
which gave me info like this for every disk on the host:
esxcli vsan storage list
Then I could run the command
esxcli vsan storage remove -u UUID
where UUID is the VSAN Disk Group UUID listed for the relevent disks. In this example, I would run
esxcli vsan storage remove -u 52709227-18ac-39ba-c7cd-8815f3eeafbe

I believe, but I don’t remember for sure, that I needed to then manually delete the partitions on the disks after this, before the VSAN disk import would recognize them.

Once I did all this, I was able to set up VSAN and create a volume. VSAN is pretty sensitive to the hardware it’s run on, and my hardware is most definitely not on the HCL. But hey, it works well enough for a lab environment.

More to come…

Currently drinking: Jekyll Brewing Southern Juice IPA

Leave a Comment

Filed under VSAN

Accessing the Rubrik API with C# .NET using RestSharp (part 1)

As I described in a previous post, at my job we recently migrated our VM backups to Rubrik. This has been extremely successful, but it broke our previous backup monitoring application, an ASP.NET web app I developed to monitor backup jobs from our previous backup application, VRanger. This web app queried the VRanger MSSQL database directly to pull job status data, and so it was a pretty simple app. Pull data from one database, insert data into another database. No biggie. But we just replaced our backup solution with Rubrik, which is an all-in-one appliance that does not have an easily-accessible SQL database to query. What it does have, however, is a REST API.

    REST API and Swagger

Rubrik, just like Nutanix, has a pretty full-featured REST API for performing operations from other applications. Chris Wahl of Rubrik has written a couple of blog posts and given some talks about using this API in vRealize Orchestrator, and has provided some sample code in PowerShell, but so far the example code out there is pretty scant, and since what I want to do right now isn’t in vRO or PowerShell, there wasn’t any good examples to work off of. So I had to figure it out myself. Hopefully this info will be helpful to someone else.

First of all, the most useful resource for the Rubrik API is the built-in API documentation. You can access it at

https://[Rubrik URL]/swagger-ui

Rubrik-swagger

This documentation is invaluable for learning what functions are available, what arguments they expect, and what data they return.

    RestSharp

I am most familiar with writing code in .NET using C#, so I started looking for libraries meant to access REST services. I quickly came upon RestSharp, which is available to install via NuGet within Visual Studio. RestSharp has a nice feature that it handles serializing and deserializing data in XML and JSON formats, which comes very handy for interacting with Rubrik. Rubrik data is passed in JSON format, and not having to worry about the conversion is pretty nice.

    Accessing Rubrik API with RestSharp

Before you can do anything else in the Rubrik API, you need to log in. You need to pass the login credentials in the body of the login request, and if successful it returns a JSON object that contains a token that needs to be passed to all subsequent API requests. Here is how I made it work:


public class LoginCreds
{
  public string userId { get; set; }
  public string password { get; set; }
}

public class LoginData
{
  public string status { get; set; }
  public string description { get; set; }
  public string userId { get; set; }
  public string token { get; set; }
}


private string Login(LoginCreds MyLogin)
{
  var client = new RestClient();
  client.BaseUrl = new Uri("https://[Rubrik URL]");
  var request = new RestRequest(Method.POST);

  request.RequestFormat = DataFormat.Json;
  request.Resource = "login";

  request.AddBody(MyLogin);

  var response = client.Execute(request);
  return response.Data.token;
}

The Login function should return the login token, which will be reused on all subsequent API calls.

One important note is that in the client.Execute() call, you specify a data type for the RestSharp library to de-serialize the return JSON data into. Then response.Data is an object in the format you specify, in this case LoginData. For API calls that return a collection of objects, you can specify the return type as a List<>, as you will see in the next example.

Note that I’m not including any exception handling in these examples. You will definitely want to enclose in a Try{} at least the client.Execute statement and any places where you reference response.Data.


public class VM
{
  public string id { get; set; }
  public string managedId { get; set; }
  public string moid { get; set; }
  public string name { get; set;
  public string vCenterId { get; set; }
  public string hostName { get; set; }
  public string hostId { get; set; }
  public string clusterName { get; set; }
  public string powerStatus { get; set; }
  public string configuredSlaDomainId { get; set; }
  public string configuredSlaDomainName { get; set; }
  public string effectiveSlaDomainId { get; set; }
  public string effectiveSlaDomainName { get; set; }
  public string effectiveSlaSourceManagedId { get; set; }
  public DateTime protectionDate { get; set; }
  public string ipAddress { get; set; }
  public string toolsInstalled { get; set; }
  public string snapshotCount { get; set; }
  public string primaryClusterUuid { get; set; }
  public string isReplicationEnabled { get; set; }
  public string isArchived { get; set; }
}


private void GetVMs(string token)
{
  var client = new RestClient();
  client.BaseUrl = new Uri("https://[Rubrik URL]");
  var request = new RestRequest(Method.GET);
  request.RequestFormat = DataFormat.Json;
  request.Resource = "vm";
  string authtoken = System.Convert.ToBase64String(System.Text.Encoding.UTF8.GetBytes(token + ":"));
  request.AddHeader("Authorization", "Basic " + authtoken);
  var response = client.Execute>(request);
  if (response.ResponseStatus == ResponseStatus.Error)
    MessageBox.Show("ResponseStatus.Error");
  else
  {
    txtOutput.Text += "VM Count = " + response.Data.Count + Environment.NewLine;
    foreach (VM theVM in response.Data)
    {
      txtOutput.Text += theVM.name + " - " + theVM.configuredSlaDomainName + Environment.NewLine;
    }
  }
}

That covers it for now. I was pretty excited when I got that much working. I haven’t actually written anything that actually does anything with this API yet, but having got this far, the rest should be cake. I will show what else I actually do with the Rubrik API in the next post.

Currently drinking: Sierra Nevada Northern Hemisphere Harvest Wet Hop IPA

1 Comment

Filed under Uncategorized

Our transition to Rubrik backups

    Background

At my day job a few years ago, I wrote a web app to help with monitoring the backup jobs for our VM environment. We used a tool called VRanger (by Quest Software, previously Dell Software, previously Quest Software) to do all our VMware backups. For those unfamiliar, VRanger is pretty similar in concept to Veeam, as a dedicated vSphere backup solution. It worked pretty well for us, but one of the major shortfalls was that when scheduled backups failed for whatever reason, there wasn’t good record-keeping to let us know.

VM backup jobs would fail fairly frequently, but we only backed up each VM once per day and most of the time the change rate wasn’t very high, so if a VM didn’t get backed up for a day, it wasn’t that big of a deal. If the job failed a couple times in a row though, that was a big deal, and VRanger didn’t have a way to alert on that. So I wrote an application to keep track of it.

VRanger kept all of its data in a MSSQL database, and so it was pretty easy to query the database and get the job data, and from that render a pretty web page with the relevant data and send an alert when a VM had gone for a few cycles without successfully backing up. Piece of cake.

The problem was, VRanger kinda sucks, and we were about to get a much better VM backup solution (that’s a problem?)

    Enter Rubrik

Let’s get this out of the way right now. Rubrik is F@$kin’ sweet.

By this point we were about 85% virtual, so VM backups were really important, and physical backups were less so. We needed a new backup solution, as we had well outgrown our existing VRanger/DataDomain system, and needed something new. We checked out several solutions, including Avamar, which was frankly funny. EMC wanted to sell us their entire software suite and a half rack of DataDomain, some Isilon, and a bunch of other shit.

Then there was this new player called Rubrik. They have an appliance with a stack of disks in it, that talks to vCenter, and just handles backups. We got their SE to bring a POC box in, and within 10 minutes we had it configured, talking to vCenter, and had set up a backup job on a VM. The SE then walked us through doing a live mount of the VM we just backed up in vCenter, which took that backup, registered it as a new VM in vCenter, and powered it on, all with the storage running off of Rubrik box. The Rubrik registers itself with vCenter as an NFS datastore. From start to running VM, maybe 2 minutes tops. And then if I want to restore that new VM permanently, it’s just a storage vMotion from the Rubrik to permanent storage. So slick.

    Sorry EMC

So yea, we bought Rubrik. There’s a bunch of other reasons why we decided on it versus the other choices, but simplicity was the main theme. From creating backup SLAs, to setting up notifications, to restores, to spinning up temporary environments, Rubrik won on ease of use. Of course, migrating to Rubrik sorta broke my VM backup monitoring application, but that’s a different post.

P.S. If you want to annoy a long-time Rubrik employee, ask them about the adhesive on their bezels. Much fun to be had.

Currently drinking: Sierra Nevada Northern Hemisphere Harvest Wet Hop IPA

Leave a Comment

Filed under Uncategorized

Picking a New T1 Router

So as part of the New Store Network Architecture project, one of the major decisions to make was what piece of equipment to use as a T1 router.  All our stores have T1 connections on MPLS, and there is no interest from management to move away from that, so we need some sort of router to connect to the T1 in each store.  We had been using a mixture of Cisco 2610s and 1841s in our stores, but from the beginning we bought them grey-market, so we never had support on them, and were limited to the IOS that came on them.  Since we were actually taking the time to do this project right, and had the budget and the go-ahead to replace with new equipment, we decided to look into new routers.

The architecture that we had planned out for this network meant that the router would not be responsible for much.  We need the router to run BGP, but other than that we could get away with a media converter, if such thing existed.  So while we could have gotten a Cisco 1900, which certainly would have done the job, we instead looked at Adtran.  Adtran offers free lifetime software updates and generous support terms, for a significantly lower price than Cisco.  And for our fairly simple needs, Adtran’s Netvanta 3200 series routers fit the bill almost exactly.  One T1 interface, 1 Ethernet interface, runs BGP, and no frills.  I tested it out, and was able to get it working sufficiently in the lab, so I felt pretty comfortable with the decision.  There were a couple annoyances with configuration of the device, namely the way you have to enable the BGP neighbor in two different places, but once I figured it out, it wasn’t too bad.  One relatively serious gripe, however, is that the routers do not have an SSH client.  It is possible to telnet out of one to another device, but not SSH.  This has bit us a couple times when we’ve had misconfigured equipment shipped to a site hundreds of miles away, and it would be really easy to fix if we could just SSH from the router.

So we bought and are deploying several hundred Adtran Netvanta 3205 routers.    So far, so good.


Currently drinking: Cigar City Maduro Brown Ale

Leave a Comment

Filed under IT

My very first Comcast rant

I have had Comcast internet service for almost a year now, but I never really felt like a real Comcast customer until just this past week.  And by that I mean, until this week I haven’t personally experienced any crazy customer-unfriendly policies.  Well, I finally got that over with!

Before Comcast, I had been using DSL for almost a decade, most of that with a small local ISP called Atlantic Nexus.  When I first got service with them, they were amazing.  I could call them at 3AM on a Saturday and reach a support person that could actually fix problems, and not even have to wait on hold for long.  Plus, their prices were great, they offered a static IP address for like $5 extra, and their terms of service were pretty much “do with it as you please.”  They didn’t block ports, didn’t impose data caps, their tech support people didn’t flinch when I said that I was running PPPoE on an OpenBSD-based dedicated firewall…. it was awesome.  Some time in the past couple years though, all of that changed.  It was subtle at first: a tech at first not knowing what a DDoS was, then insisting that it wasn’t happening to me, when it was pretty clear that it was (oh Call of Duty players, how much I DON’T miss you).  Then it became harder and harder to reach support, or any human at all.  When you call their number, they have a 3-option menu, you choose one of the options (ordering, billing, tech support) and it rings for 30-45 seconds, and if nobody picks up you get a prompt to leave a message.  The time between leaving a message and getting a callback grew, until near the end where it took a week, leaving messages every day, before I got a callback from them.  Thankfully that was just before I was about to move from my old apartment, so when they finally did call back, I cancelled my service.  This is really too bad; years ago they were amazing, and I recommended them to everyone.  Today, I don’t even have to warn people away, because Atlantic Nexus probably won’t even return their call for a new service order.

Anyway, I moved from that apartment into my current place about 10 months ago, and took the opportunity to upgrade my internet service. My choices were Comcast or…. well, it was Comcast.  I had big plans for my internet connection, so I called Comcast and asked about static IPs.  Nope, not on residential plans, only on business.  So that was a shock, my monthly internet bill just went from $55 for DSL, to $138 for Comcast.  The upside is that the service is much faster, 50M/10M instead of 6M/768k, and I have 5 static IPs instead of 1.  So it costs more, but the service is so much better that I can live with it.

One thing that did bother me though was that on my bill every month I get a $13 equipment rental charge.  That sucks, and I want to get rid of it.  I did some research, and it seems that one of the highest-rated cable modems is the Motorola/Arris Surfboard SB6141.  It’s a DOCSIS 3.0 modem, 8 download and 4 upload channels, says on the box that it supports download speeds up to 343 Mbps, says that it’s compatible with Comcast, and shows up on Comcast’s list of supported deviced.  Looks like a winner.  $90 on Amazon.  In 7 months it will have paid for itself.  So I bought it a few months ago.  Stupid mistake, I didn’t immediately hook it up.  There was always some reason I couldn’t get on the phone with Comcast support, couldn’t afford to have internet down, etc.  Well, this week I finally had the opportunity to hook it up.  I was home sick one day, and so I was actually available to be on the phone with Comcast during regular business hours.

“Estimated hold time is longer than 10 minutes.”

Well, technically they weren’t lying.  An hour and a half later, someone finally picked up the phone.  I explain what I’m trying to do, and that the self-service modem registration page didn’t work.  The nice young lady assures me there’s no issues, we will be able to get it taken care of.  “And my static IPs will work, right?”  She assures me that they will.  For the next 20 minutes or so, she tries to get the new modem registered, and can’t make it work.  Puts me on hold.  Comes back, tries some more stuff.  Puts me on hold again.  Comes back and informs me that she doesn’t know how to make the modem work.  Says that she will refer this to Tier 2, that I should leave the new modem connected, and someone from Tier 2 will fix the issue in the next 24 hours.  “Is that okay?”  Ummm, no.  That is not okay at all.  Never mind that I have to VPN into work later that night, how the hell can a tech support person from an ISP not know how to replace a damn cable modem?  She apologized and said that she would get her supervisor to help her try to get this cable modem registered.  Put me back on hold again.  Eventually she comes back, tries something, and I see the modem reboot.  That’s a good sign.  I have my laptop plugged directly into the modem, and when the modem comes back up I get a public IP via DHCP.  Cool.  Not MY IP, but it’s a start.  Next I statically assign my laptop with one of my static IPs.  Nada.  No joy.  I try some stuff, she tries some stuff, no luck.  She puts me on hold again to ask around with her coworkers.  Comes back, apologizes again, and informs me of a Comcast policy that neither of us had ever heard of before.

Comcast Business does not support static IPs on customer-owned devices.

Seriously.  I consulted the all-knowing Google and found others complaining about the same thing.  This of course only refers to their coax connections.  I’d love to see them try to impose that kind of restriction on their Ethernet service.

So we roll back.  This at least she is able to do without trouble; the only part that takes any real time is the surprisingly slow reboot of the SMC modem/router/WiFi/VoIP gateway thing that I apparently need to continue to pay $13 a month to keep around.  At least one good thing that came out of this: after it was clear I was keeping Comcast’s modem, I got her to disable the “XfinityWiFi” SSID that it had been broadcasting.  Allowing others to leach off of my internet connection?  Hell no!  I am paying for that bandwidth!

One last annoyance.  Remember when I said that it was a stupid mistake not immediately hooking up the new cable modem as soon as I got it?  It had been so long since I got it, Amazon won’t take it back as a return.  So now I need to try to find someone to buy an almost-top-of-the-line, almost-brand-new cable modem from me.  I paid $90 for it, I’ll be lucky if I get $50.


Currently drinking: Leinenkugel’s Canoe Paddler

Leave a Comment

Filed under IT, Rants

Our datacenter move has officially begun! And preliminary thoughts about Brocade MLX

My company is preparing to move our corporate headquarters next year, and part of this naturally is the datacenter.  All along we have hosted all our IT operations in our own datacenter inside the corporate HQ, but now we are planning to move operations to a co-location facility.  I can see why we never did this before, since we had been running on primarily stacks of physical servers, with a high of around 22 racks, so co-location space would have been expensive.  Also, connectivity was much more expensive and slow.  And since our current HQ already had a dedicated datacenter space with big Liebert AC units when we moved in, it made perfect sense to host all our IT operations locally.

These days, however, we are about 90% virtual, and so it makes a lot of sense to move our datacenter operations to a co-location facility.  We started evaluating locations a couple months ago, and pretty quickly narrowed down the field to just a couple contenders.  We considered options like QTS, Peak 10, Sungard, and several others, and after a whole bunch of tours, hand-wringing, and contract negotiation, we decided on a co-lo vendor.  No, I’m not going to say which one.

Management is really antsy to start moving in to the new facility, and so even though we don’t have power in our cage yet, or even, you know, A CAGE, we spent our Friday installing routers in our racks at the new co-lo.    You might wonder how it’s possible to spend most of a day installing 4 routers (and 1 switch! Don’t forget about that!) but that just means that you’ve never seen the insanity and overengineering that is the Brocade MLX rack-mounting kit.

I love Brocade, don’t get me wrong.  OK, I love most Brocade stuff.  But the rackmount solution that comes with the MLX routers is laughable.  It has two front-mount rack ears, each held on with 4 tiny screws.  And they expect that you will use that to rack mount a router that is the FULL depth of a rack cabinet, and weighs 70 pounds easily.  Ummm… no.   The alternative is even more ridiculous, somehow.  Brocade sells separately a rack-mount kit with a ducted air intake, that is certainly a lot more secure of a mounting solution.  This piece of over-engineered aluminum is something like $2000.  Seriously.

In order to save on front panel space, the MLX has it’s air intake on the left side.  The rack mount kit is a big 2U hollow aluminum shelf that has an open face on the front to allow air to come in, then it sticks out a bit on the left side with a vertical duct that rises up the full height of the router, and allowed air to be pulled through the intakes on the side of the router.  This allows air to come in the front of the rack, and be exhausted out the back.  And most importantly, it provides a secure shelf that the router can rest on, that is secured to the rack with 6 screws in the front and 6 in the back, in addition to the 8 screws that the router’s rack ears take to attach it to the front of the rack.  At least I’m not afraid of a router that costs more than my house falling out of the rack.

Anyway, most of my Friday later, here it is, proof that we have officially started to move in to our new co-lo facility!

MLXs at our new Co-Lo space!

Please don’t fall please don’t fall please don’t fall


Currently drinking: Humboldt Brewing Company Red Nectar

Leave a Comment

Filed under Datacenter Move, IT

Apparently I live in the sticks.

I took this picture in my neighborhood leaving home for work one morning.  Apparently I live in the sticks.  Yes, that is a turkey.  I see deer sometimes too.

A wild turkey.  Just hanging out in my neighborhood.  Apparently I live in the sticks.

A wild turkey. Just hanging out in my neighborhood. Apparently I live in the sticks.


Currently drinking: Terrapin Golden Ale

Leave a Comment

Filed under Uncategorized

New Store Network Architecture Project

So the company that I work for is a retailer with a couple hundred locations.  Our IT backend has slowly been improving, but as a department we are perpetually understaffed and underfunded.  This kind of explains the state of the network equipment in our stores.  It’s a little embarrassing, really, but we are finally working to make it better.

Our current setup in our stores is a Cisco 1841 router and a 2950 24-port switch.  That’s it.  WAN connectivity is a T1.  The switch has a couple VLANs on it for regular network equipment and for the POS system.  The router has some ACLs controlling access to/from the network segments.   Honestly this was some pretty cool stuff in 2005.  It was even acceptable when these pieces of equipment went end-of-sale in 2007.  But here we are 8 years later.

This setup has allowed us to pass PCI for a couple years now, but with the new PCI 3.0 rules, a stateful firewall is required, and we won’t be able to coast another year.   Combine this new requirement with some high-profile breaches from Target and Home Depot, and our management is finally scared enough to give us the money to modernize our store IT infrastructure.  And since we finally get a chance to redesign the store network with a clean sheet, we are doing our best to make sure that the new design is as secure as we can make it, is scalable, has room for expansion and extension to things we haven’t thought of yet, and is thoroughly kick-ass.  And most importantly, this whole project will require a store visit to every store to rip and replace, so we can actually change things, and not be beholden to decisions that were hastily made 10 years ago and have been a millstone around our necks ever since.

Can you tell I’m excited about this?

We started this project by planning out what we want the network to look like.  It came down to several whiteboarding sessions, with careful consideration of what our stores look like now, what they SHOULD look like now, and what decisions we can make now to ensure that we (or our successors) won’t be cursing us 5 or 10 years down the line.

Once we got our design 95% finalized, we started to think about what equipment and systems we would need to make it all happen.  Some of it was obvious or pre-ordained (like the wireless solution, which I will discuss in a future post), but there were three places where we knew that we need a piece of equipment, and need to decide what would fill that role.  First, and most obviously, we need a firewall.  Second, we need a new switch.  A bit of luck happened on this front, which allowed us to bypass the beancounter (yes, singular) a bit and get something much better than we otherwise would have been allowed to get.  Third, we need a router.  In our new design the router is no longer the single point of security enforcement like it was before, but the fact is, every one of our stores has a T1 on MPLS, so we need a router to connect to it.  Honestly, if there was such thing as an Ethernet-to-T1 media converter, we would have used it, but there isn’t, so a-router-shopping we will go.

As I’m writing this, most of the decisions on this project have been made already.  I’m writing it all up, because maybe somebody else will be able to get something out of the work that we put into our evaluations of different equipment.   I will write some future posts detailing the evaluation process for the equipment that we chose, the decisions we made, and how things have shaked out, but I think this will do for now.

To read more about this project, follow the tag New Store Architecture


Currently drinking: Cruzan rum and IBC root beer

Leave a Comment

Filed under IT

Welcome to my blog!

Well, it’s about time that I get this thing started, eh?

You can read a bunch about me on the About Me page on here, so I’m not going to repeat myself too much.  I decided to start this blog because as a network engineer in a shop that really should have a much bigger IT staff than we do, I run into entirely too much odd stuff, and I feel that it would be a shame to not record it so that future admins and engineers can maybe learn something, or at least get a laugh.  Probably at my expense.  There is a permanent forehead-shaped indentation in the wall next to my desk.

That said, I don’t want to limit this blog to just IT.  I am a big fan of beer and other adult beverages, and every once in a while I find something that I want to share my thoughts about.  In fact, the thing that actually catalyzed this blog and made me get off my ass to make it was a beer discovery.  So that’s something I will talk about some.  That catalyzing post will be coming really soon.  It will even have a couple pictures in it!

I also plan on writing some things just because I want to.  Not IT-related, not beer-related, just Me-related.  For example, I’m rather a fan of SpaceX, and the recent Falcon 9 launch failure was pretty heartbreaking, so I might write something about that.  I’m not an aerospace guy though, so there’s no danger that this blog will go full-time space-cadet.  It’s just something I like that I may write something about.  If these side topics don’t interest you, don’t worry.  I’ll try to tag the topic-relevent posts, so you can filter out the random thoughts if you just want to get to the tech or the beer.

Anyway, enough of an introduction.  I’ve got a half a bottle of rum and a six-pack of IBC root beer, and I feel like writing.  Let’s do this!


currently drinking: Cruzan rum and IBC root beer

Leave a Comment

Filed under Uncategorized